Credit to http://www.onetipaday.com/2006/10/15/how-to-save-put-outlook-notes-on-your-desktop
I often use the Microsoft Outlook Notes to store To-Do lists that are not related to work. I discovered this great tip a few months which allows me to put my notes on my desktop, and I love it as it means I can access my notes without having to open up Outlook.
To create a note in Outlook:
1. On the File menu, point to New, and then click Note.
2. Type the text of the note.
3. To close the note, click the × in the upper-right corner of the note.
Then to put the notes on your desktop do the following:
1. Right-click the desktop, point to New, and click Shortcut.
2. In the Type the location of the item box, type the following path: “C:\Program Files\Microsoft Office\OfficeXX\OUTLOOK.EXE” /c ipm.stickynote (note OfficeXX - XX needs to be replaced with your version of Office.
3. Click Next, name the shortcut, and then click Finish.
Now, when you double-click the shortcut, an Outlook note will appear on your desktop.
Wednesday, October 15, 2008
Excel Services Event ID: 5226
If you have installed SharePoint per default configurations you will most likely not get issues like this, but in most enterprise installs logs and temp files are relocated. To fix the error below. Please review error then read below for solution.
Event Type: Error
Event Source: Office SharePoint Server
Event Category: Excel Calculation Services
Event ID: 5226
Date: 10/15/2008
Time: 9:32:36 AM
User: N/A
Computer: CR2RCHIISIME
Description:
Unable to create or access workbook cache at D:\Temp\Excel Server\FileCache\BaselII-CIT-SSP-423345403\Charts. Excel Services is unable to function without a workbook cache.
For more information, see Help and Support Center at http://go.microsoft.com/fwlink/events.asp.
Solution I manually created the D:\Temp\Excel Server\FileCache\BaselII-CIT-SSP-423345403\Charts directory then on the Security tab for the Temp directory, the WSS_ADMIN_WPG Windows group should have Full Control and the WSS_WPG Windows group should have Read & Execute, List Folder Contents, and Read permissions or higher on the folder. If they do not, assign these permissions by using the procedure in the "Assign sufficient permissions" section.
Also, this solution works if you get Trace Log errors.
Friday, August 01, 2008
Date in Task Bar
Got this from Windows XP site. Worth re-post
To display the date as well as the time, you need to make the taskbar "taller" by dragging the top edge upward. This procedure is fairly simple but it does require reasonably precise mouse handling. If you are new to computing and still developing your mouse-skills, expanding the taskbar, or returning it to the default height, may prove to be a little problematical. If you are not yet confident with fiddly mouse manipulation, I would suggest that you postpone using this tip until you gain more mousing experience.
Here's how to expand the taskbar:
The taskbar needs to be "unlocked" before you can expand it. To check, right-click the taskbar and ensure that "Lock the Taskbar" is not ticked. If there is a tick, click "Lock the Taskbar" to untick it.
Close any running programs so that the taskbar is uncluttered and easier to manipulate.
Move your mouse to the top edge of the taskbar until the cursor turns into a doubled-ended arrow.
With the doubled-ended arrow displayed, hold down the left mouse button and drag the taskbar upward until it is about twice the normal height.
The day and date should now be displayed below the Notification Area clock.
If desired, you can now re-lock the taskbar.
The expanded taskbar not only permanently displays the day and date, it also provides extra display space for taskbar and notification area icons. Of course, the downside of an expanded taskbar is that you have less screen display area for programs and files.
To return the taskbar to its original height, follow the procedure outlined above but reverse the drag direction specified in step 4. That is, with the doubled-ended arrow displayed, hold down the left mouse button and drag the taskbar towards the bottom of the screen until it is the normal height.
Tuesday, July 29, 2008
SQL Server Reporting Services Datasource Security
http://technet.microsoft.com/en-us/library/ms160330.aspx
Stored Credentials
You can store the credentials used to access an external data source. Credentials are stored in reversible encryption in the report server database. You can specify one set of stored credentials for each data source used in a report. The credentials you provide retrieve the same data for every user who runs the report.
Stored credentials are recommended as part of a strategy for accessing remote database servers. Stored credentials are required if you want to support subscriptions, or schedule report history generation or report snapshot refreshes. When a report runs as as a background process, the report server is the agent that executes the report. Because there is no user context in place, the report server must get credential information from the report server database in order to connect to a data source.
The user name and password that you specify can be Windows credentials or a database login. If you specify Windows credentials, the report server passes the credentials to Windows for subsequent authentication. Otherwise, the credentials are passed to the database server for authentication.
Windows Integrated Security
When you use the Windows Integrated Security option, the report server passes the security token of the user accessing the report to the server hosting the external data source. In this case, the user is not prompted to type a user name or password.
This approach is recommended if Kerberos is enabled. If Kerberos is not enabled, you should only use this approach if all the servers that you want to access are located on the same computer.
In other words each user would need to be added access to the Database Hosted on SQL Server
Wednesday, July 02, 2008
SQL Network Interfaces, error: 26 - Error Locating Server/Instance Specified or Named Pipes Provider, error: 40 - Could not open a connection to SQL S
The problem was that the remote connection needed to utilize Named Pipes, but in order to utilize Named Pipes both the machine hosting the instance of SQL and the my local machine must have the alias:
With Supports instruction I went to SQL Server configuration Manager, expanded SQL Native Client Configuration and right clicked Aliases and created the alias on the machine and did the same for my personal machine and what do you know, it worked.
With Supports instruction I went to SQL Server configuration Manager, expanded SQL Native Client Configuration and right clicked Aliases and created the alias on the machine and did the same for my personal machine and what do you know, it worked.
Tuesday, July 01, 2008
How to determine what ports are open
start -> run -> cmd
netstat -na
look for :3306 and LISTEN on the same line...
OR..also from command prompt
telnet localhost 3306
netstat -na
look for :3306 and LISTEN on the same line...
OR..also from command prompt
telnet localhost 3306
Friday, June 27, 2008
Vitual PC 2007
Well, it has been a while since I have blogged due to the project I am working on at work. The project MOSS 2007 from dev, test, and prod.
Before dev there is a place called pre-dev, where developers like myself need a place to develop, so this past March I attended the SharePoint 2007 conference where I met some great resources and obtained a VHD of MOSS 2007 and learned that most developer's develop in this fashion by downloading and installing the software from the MSDN Subscription, and routing code to a source control server.
Well I installed and could not get it to run, due to my lack of knowledge of Virtual PC 2007. I have a laptop with 1 gig of RAM and a external HD with 500 gig so I installed the VHD and fired up the Virtual PC, but I kept getting an error. Not enough memory on the host machine.
I thought to myself, "That is strange 1 gig should be enough memory to get my image up and running." Well it turns out I had to much memory allocated to the VM, so I set it back to 512mb and bam... The VM started to run, but it is also running dog slow, so in closing have 2 gig of RAM so you can allocate 1 gig to the VM.
Hope this helps out my fellow developers.
OUT... Moojjoo
Wednesday, March 26, 2008
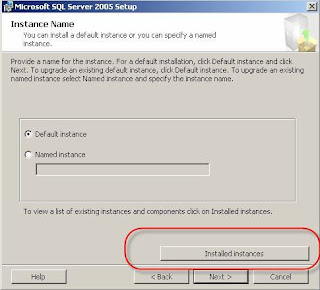
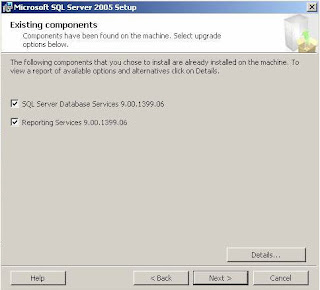
Upgrading from SQL Express 2005 to SQL 2005 Developer Edition
Upgrading from SQL Express 2005 to SQL 2005 Developer Edition (2 hours)
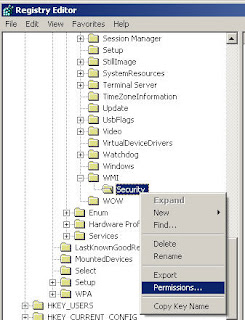
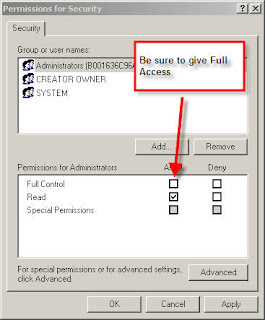
Note: First ensure you have access to the following key in the registry
You are most likely an admin if you are installing Developer Edition of SQL 2005 so be sure the following setting is set.
Go to Start > Run > enter regedit>
SYSTEM\CurrentControlSet\Control\WMI\Security ß Give Admins Full Contrl (Be sure to change this back so you don’t get yourself into trouble) >
Next slap the DVD or CD’s into your Rom Drive>
Start > Run > cmd>

Follow the prompts>

User your UID, PWD and Domain>
Your good to go when you see:>
Don't forget Service Pack 2
Note: First ensure you have access to the following key in the registry
You are most likely an admin if you are installing Developer Edition of SQL 2005 so be sure the following setting is set.
Go to Start > Run > enter regedit>
SYSTEM\CurrentControlSet\Control\WMI\Security ß Give Admins Full Contrl (Be sure to change this back so you don’t get yourself into trouble) >
Next slap the DVD or CD’s into your Rom Drive>
Start > Run > cmd>
Follow the prompts>
User your UID, PWD and Domain>
Your good to go when you see:>
Don't forget Service Pack 2
Tuesday, March 04, 2008
MCTS - SharePoint Developer
Passed the Microsoft Exam SharePoint 2007 Developer
I am now officially and Microsoft Certified Technical Specialist.
I am now officially and Microsoft Certified Technical Specialist.
Wednesday, February 20, 2008
Back versus Attaching to MDF
Chintal my new programming parnter taught an old dog a new trick today. Instead of backing up and restoring databases simply open Windows Explorer and copy the .MDF and .LDF and zip move, copy, cut and attach back with SQL Server Management Studio SSMS.
Thursday, February 14, 2008
Working with Infrastructure in the Enterprise as a Programmer Analyst
For 10 years I have been working as an analyst first then putting on the programmer hat and developing applications. In corporate America you need to concentrate on your ability to work with your infrastructure architects and be very open minded. I have learned that you must take time to explain in great detail what your solution design is doing. Most web solutions involve web servers and database servers along with needing separate environments for development, user acceptance testing and production. Your solution may be Intranet or Internet, but the key to working with your infrastructure architect is to document, document, document. Use applications such as Visio to convey to them what you are trying to accomplish in the form of a picture (Remember a picture speaks a thousand words). It will save you your sanity and provide a great working relationship with your architect. Humans are not mind readers so document and draw your solution with time and patience. And last, but not least be sure to consult with your architect and have your environments built before coding a solution and ensure all the environment mirror one another, that way you will not freak out when your app works in one environment and not the other.
Words of Wisdom from an individual who loves what they do, but has pulled a bit of hair out learning the ropes.
Thanks to my mentors
Doug Cain
Larry Leonard
Eddie Clodfelter
Troy Tucker
Robert Petree
Shaun Todd
Saran
Garry Blanks
Kelly O'Donnell
Words of Wisdom from an individual who loves what they do, but has pulled a bit of hair out learning the ropes.
Thanks to my mentors
Doug Cain
Larry Leonard
Eddie Clodfelter
Troy Tucker
Robert Petree
Shaun Todd
Saran
Garry Blanks
Kelly O'Donnell
Monday, February 04, 2008
Start explorer in C:
Start Windows Explorer In The C Drive
In the Explorer property sheet use this path and switches in the target:
C:\windows\explorer.exe /n,/e,c:\
Since the first days Windows Explorer appeared, the list of switches reproduced below has been floating around the internet. I'm not sure who was the first to assemble the list but here it is in its entirety. Play around with it and see if one of the views is what you're seeking. Just copy and paste the bold text into the Target line on the Property Sheet of Windows Explorer. If it's not what you expected you can always switch back to the default view by using C:\WINDOWS\explorer.exe in the Target line.
"My Computer" highlighted in left side with all drives visible but not expanded and C: highlighted in right side: %SystemRoot%\explorer.exe /e,/select,c:
Desktop highlighted and nothing expanded: %SystemRoot%\explorer.exe /e,/n,/select,/root,c:
All drives visible and the system drive highlighted and expanded in full screen: %SystemRoot%\explorer.exe /e,/select
All drives visible and the system drive expanded in small screen: %SystemRoot%\explorer.exe /e,/select,%systemroot%
Only Windows Directory visible highlighted and expanded: %SystemRoot%\explorer.exe /e,/root,%systemroot%
All drives visible but only C: highlighted and expanded: %SystemRoot%\explorer.exe /e,c:
Nothing expanded and My Computer highlighted in right side: %SystemRoot%\explorer.exe /n,/e,/select,
Opens the Windows folder as a folder: %SystemRoot%\explorer.exe %systemroot%
Opens as "My Computer": %SystemRoot%\explorer.exe %systemroot%,
This opens the Desktop folder with "My Computer" highlighted: %SystemRoot%\explorer.exe %systemroot%,/select,
"Desktop" highlighted in the left side and no drives visible:
%systemroot%\explorer.exe /e,/root,::{20D04FE0-3AEA-1069-A2D8-08002B30309D},/select
"My Computer" highlighted in left side and all drives visible but none expanded:
%systemroot%\explorer.exe /e,/root,::{20D04FE0-3AEA-1069-A2D8-08002B30309D}
"Desktop" in left side highlighted and "My Computer" highlighted in right side and no drives visible:
%systemroot%\explorer.exe /e,/select,::{20D04FE0-3AEA-1069-A2D8-08002B30309D}
Wednesday, January 02, 2008
Kill Instance of Application
Recently I was receiving an issue with an application I am supporting.
Problem
The application is a .NET Console application that using Microsoft Word to create reports. The problem is that an exception error would occur if Microsoft Word (WINWORD = Instance Name) was running.
Solution
// Code to kill Word issues if WINWORD is running on the current machine
// if word is running the reports will throw an exception so // we must ensure the Microsoft Word application is not running Process[] wordProcess = System.Diagnostics.Process.GetProcessesByName("WINWORD");if (wordProcess.Length <= 1)
{
foreach (Process p in wordProcess)
{
p.Kill();
}
}
Thursday, December 20, 2007
Year End
Well, another year is coming to an end and what a year it has been. I have seen my Wife and daughter grow to be best little buddies. Also my daughter learning at an incredible pace. As for my life in the development world I took on a new job. Switched from R.J. Reynolds to Bank of America in July.This was a great move with more challenging work. This year I can add to my resume that I am a Microsoft SharePoint 2007 Guru, Microsoft InfoPath Developer, .NET Web Service Developer, along with SQL Server Reporting Services. Visual Studio 2008, so that will be my new challenge next year.
Tuesday, December 18, 2007
Monday, December 17, 2007
Friday, December 14, 2007


Stored Procs
Please be aware if you are inserting data into a data field with a value type of int and allows null be sure to set the @Param int = null
This will prevent errors when submitting.
This will prevent errors when submitting.
Wednesday, December 12, 2007
Identity Information
Introduction
About Identity Columns
If you have worked with SQL Server, you are probably familiar with identity columns. These are equivalent to the "AutoNumber" columns in Access. The main purpose of these columns is to provide a primary key to the table when a primary key cannot be defined using other fields in the table.
These columns are like any other column except that their value is not inserted by the user, but by the system itself.
Syntax
IDENTITY [ ( seed , increment ) ]
Where:
seed - Is the value that is used for the very first row that is inserted into the table.
increment- Is the incremental value that is added to the previous identity value and thereby to get new value for the new row that is going to be added.
Note: You must specify both the seed and increment or neither. If neither is specified, the default is (1,1).
A few things you need to know about the identity columns:
· They should be of data type int, smallint, tinyint, decimal or numeric with scale 0.
· They cannot contain null values
· They cannot have any default values
· The identity increment is an integral value (1, -1, 5, etc.) and cannot contain decimals. Also, it cannot be 0.
· Identity Seed is 1 by default, and so is the Identity Increment. If you leave the seed field empty, it becomes 0.
Functions associated with IDENTITY column
· @@IDENTITY
When a record is inserted into a table with an identity column, the function @@IDENTITY returns the last identity value that was inserted in the database.
Syntax
@@IDENTITY
I emphasize the phrase "last identity value" here because this may be different from the identity value of that particular table where the record was inserted.
Why? When a record is inserted and if there is any underlying trigger that modifies other tables, the value can be different. If a trigger adds a record into another table, which happens to have an identity column, @@IDENTITY will now return this new value instead.
· Scope_IDENTITY
Returns the last IDENTITY value inserted into an IDENTITY column in the same scope. A scope is a stored procedure, function, or batch. Thus, two statements are in the same scope if they are in the same stored procedure, function, or batch. It may be more clear from the example below.
Syntax
SCOPE_IDENTITY()
· IDENT_CURRENT
Returns the last identity value generated for a specified table in any session and any scope.
Syntax
IDENT_CURRENT('table_name')
· IDENT_SEED
Returns the seed value specified during the creation of an identity column in a table that has an identity column.
Syntax
IDENT_SEED('table_name')
· IDENT_INCR
Returns the increment value specified during the creation of an identity column in a table that has an identity column.
Syntax
IDENT_INCR('table_name')
Examples and Tips
Example
-- Consider the 2 Tables
CREATE TABLE Student(studId int IDENTITY(1,1), studName varchar(30))
CREATE TABLE Copy_Student(sid int IDENTITY(100,1))
GO
--Create trigger for insert on table Student
CREATE TRIGGER trgStudent ON Student FOR INSERT
AS
BEGIN
INSERT INTO Copy_Student DEFAULT VALUES
END
GO
--Check The Tables
SELECT * FROM Student --No records
SELECT * FROM Copy_Student --No records
GO
--Now do the following to check out the difference
INSERT INTO Student(studName) VALUES('Anjali Chelawat')
SELECT @@IDENTITY AS [IDENTITY]
--Returns the value 100, which was inserted by the trigger that is by the second insert statement.
SELECT SCOPE_IDENTITY() AS [SCOPE_IDENTITY]
--Returns the value 1, which was inserted by the Student table INSERT Statement before the trigger's insert statement.
SELECT IDENT_CURRENT('student') AS [IDENT_CURRENT]
--Returns last identity value inserted into Student.
SELECT IDENT_CURRENT('copy_student') AS [IDENT_CURRENT]
--Returns last identity value inserted into Copy_Student.
SELECT IDENT_INCR('student') AS [IDENT_INCR]
-- Returns the increment value of the identity column of the table Student. The value provided at the time of creation of the identity column
SELECT IDENT_SEED('student') AS [IDENT_SEED]
-- Returns the seed value of the identity column of the table Student. The value provided at the time of creation of the identity column
A Few Tips
· Allowing inserts to identity columns:
If you are inserting data from some other source to a table with an identity column and you need to ensure you retain the identity values, you can temporarily allow inserts to the identity column. Without doing so explicitly you will receive an error if you attempt to insert a value into the identity column. For example, if I have a table named MYTABLE and I want to allow inserts into the identity column, I can execute the following:
Syntax
set identity_ insert table_name on
Once you execute the command you will be able to insert values into the table's identity column. This will stay in effect in until you turn it off by executing the following:
Syntax
set identity_insert table_name off
Note: Be aware that at any time, only a single table in a session can have the identity_insert set to on. If you attempt to enable this for a table and another table already has this enabled, you will receive an error and will not be able to do so until you first turn this off for the other table. Also, if the value used for the identity is larger than the current identity value then the new value will be used for the identity seed for the column.
· Reseeding the identity value:
You can reseed the identity value, that is, to have the identity values reset or start at a new predefined value by using DBCC CHECKIDENT. For example, if I have a table named MYTABLE and I want to reseed the identity column to 30 I would execute the following:
dbcc checkident (‘table_name’, reseed, 30)
If you wanted to reseed the table to start with an identity of 1 with the next insert then you would reseed the table's identity to 0. The identity seed is what the value is currently at, meaning that the next value will increment the seed and use that. However, one thing to keep in mind is that if you set the identity seed below values that you currently have in the table, that you will violate the identity column's uniqueness constraint as soon as the values start to overlap. The identity value will not just “skip” values that already exist in the table.
Points To Remember
· IDENT_CURRENT returns the last identity value generated for a specific table in any session and any scope.
· @@IDENTITY returns the last identity value generated for any table in the current session, across all scopes.
· SCOPE_IDENTITY returns the last identity value generated for any table in the current session and the current scope.
Credit to:
All About IDENTITY Columns in Sql Server 2000
by Anjali Chelawat
Published on 10/5/2006
Subscribe to:
Posts (Atom)