Many thanks to http://kjdaly.com/Blog/Details/5 Blog ----
<Target Name="BeforeBuild">
</Target>
<!--<Target Name="AfterBuild">
<AspNetCompiler VirtualPath="temp" PhysicalPath="$(ProjectDir)" />
</Target>--> <Target Name="AfterBuild" Condition="$(IsAutoBuild)=='True'">
<ItemGroup>
<DeleteAfterBuild Include="$(WebProjectOutputDir)\Web.*.config" />
</ItemGroup>
<TransformXml Source="Web.config" Transform="$(ProjectConfigTransformFileName)" Destination="$(WebProjectOutputDir)\Web.config"/>
<Delete Files="@(DeleteAfterBuild)" />
</Target>
</Project>
Assuming you have saved and checked in your project file and are in the process of creating a build definition, on the Process step of your build definition you will find under the Advanced heading a field labeled “MSBuild Arguments”. Enter the value /p:IsAutoBuild=”True”.
Simple GOTCHA, be sure to check in the PROJECT File back to Source Control before testing (DUH!)
Monday, November 12, 2012
Thursday, October 18, 2012
Move Window between monitors with keystrokes
Windows 7 function to move an application window between monitors to be very useful (by default, it is bound to the Windows Logo key + Shift + left/right arrow).
Tuesday, October 09, 2012
SQL Connection and Command Example
Private Function IsClientAdmitted(ClientID As Integer) As BooleanDim conn As SqlConnectionDim cmd As New SqlCommandDim passOrFail As StringpassOrFail = Falseconn = New SqlConnection(ConfigurationManager.ConnectionStrings("conn_string").ConnectionString())
Trycmd.CommandText = "csp_validate_progress_notes_entry"cmd.CommandType = CommandType.StoredProcedurecmd.Connection = conn
cmd.Parameters.Add(
"@ClientID", SqlDbType.Int).Value = ClientIDcmd.Connection.Open()
passOrFail = cmd.ExecuteScalar()
Return passOrFail
Catch ex As ExceptionRaiseEvent StatusMessageChanged(New StatusMessageEventArgs("Error Connecting to Database", StatusMessageEventArgs.StatusMessageType.ErrorMsg))
Return passOrFail
FinallyIf Not conn Is Nothing Thenconn.Close()End IfEnd TryEnd Function
Friday, September 28, 2012
10. Ctrl+Alt+plus sign (+)—Dealing with capturing screen images from a Remote Desktop session can be a mystery. If you press Print Screen, you get an image of your local desktop—not the remote desktop. Pressing the Ctrl+Alt+plus sign (+) keyboard shortcut captures a snapshot of the entire client window area of Remote Desktop and is the same as pressing Print Screen on your local desktop.
9. Ctrl+Alt+minus sign (-)—Sometimes you don't want an image of the entire desktop; sometimes you want just a selected window. Pressing the Ctrl+Alt+minus sign (-) keyboard shortcut captures a snapshot of just the active window within the remote desktop session. This key combination is the same as pressing Alt+Print Screen on your local desktop.
8. Alt+Home—Pressing the Alt+Home keyboard combination with Remote Desktop displays the Start menu on the remote system. The Start menu gives you quick access to the different programs installed on the remote system. This key combination is the same as pressing the Windows key on your local desktop.
7. Alt+Delete—Pressing the Alt+Delete keyboard combination in the Remote Desktop session opens the Windows menu of an application running on the remote system. The Windows menu is typically displayed under the icon in the extreme upper left corner of most Windows applications, and it lets you move and resize the application.
6. Ctrl+Alt+Break—Sometimes you might want the Remote Desktop window to be displayed in full-screen mode just as if you were using your local desktop. If you want to toggle the Remote Desktop session between a window and a full-screen display, you can press the Ctrl+Alt+Break keyboard combination.
5. Ctrl+Alt+Pause—Like the previous item, the Ctrl+Alt+Pause keyboard combination switches between full screen and windowed mode. However, with this keyboard shortcut, the remote desktop window remains at its standard size and doesn't fill the entire local desktop. Instead, it's displayed on a black background.
4. Alt+Insert—Sometimes you want a quick way to switch between the different programs that you have running. Pressing the Alt+Insert keyboard combination lets you cycle through the programs on the remote system in the order that they were opened. This process is the same as using Alt+Tab on your local desktop.
3. Alt+Page Down—Another way to cycle through the running programs on your Remote Desktop session is to use the Alt+Page Down keyboard shortcut. Pressing this key combination lets you switch between programs on the remote desktop session, moving from right to left in the Windows task switcher. This is the same as Alt+Shift+Tab on your standard desktop.
2. Alt+Page Up—Pressing Alt+Page Up lets you switch between programs on the Remote Desktop session, moving from left to right in the Windows task switcher. This is the same as Alt+Tab on your standard desktop.
1. Ctrl+Alt+End—One of the most common yet hard-to-find things that you'll need to do in a Remote Desktop session is to send a Ctrl+Alt+Del signal to the remote system. Press Ctrl+Alt+End if you need to send a Ctrl+Alt+Del keystroke combination to the remote system. This keystroke opens the Microsoft Windows Security dialog box, which lets you lock the computer, log off, change your password, and start Task Manager.
Monday, June 18, 2012
SharePoint 2010 User Profile Synchronization
Know the difference between FQDN and NETBIOS, before configuring SharePoint 2010 User Profile application be sure to know which one you need to use before setting up the Profile Application, because once setup you will have to delete the current application and perform a brand new full import.
http://blogs.msdn.com/b/russmax/archive/2010/03/20/sharepoint-2010-provisioning-user-profile-synchronization.aspx
http://blogs.msdn.com/b/russmax/archive/2010/03/20/sharepoint-2010-provisioning-user-profile-synchronization.aspx
Wednesday, September 14, 2011
SharePoint 2010 Day at Microsoft Campus in Charlotte
Getting questions answered and great overview of SharePoint 2010 for the current MOSS 2007 to SharePoint 2010 project I am currently working on in my current contract.
Friday, September 02, 2011
SharePoint 2007 & 2010 Index and Search sizes
If you need to review sizing of current implementation of SharePoint Index and Search
Go to > Central admin > Operations > Services on Server > Office SharePoint Server Search Service Settings
Copy the Default index file location : Run paste
Select and review properties that will provide the size of index
Next for Search simply navigate on SQL Server and right click on Search DB and review properties.
Wednesday, August 31, 2011
MOSS 2007 on Windows Server 2008 R2
I ran into a solution for getting Central Admin to display on Windows Server 2008 R2 today. Basically you have to open IIS 7.0 and ensure that the Physical Path is correct. For some reason the install had an incorrect physical path. I fixed it and everything worked.
Next was installing MOSS 2007 SP2 slip stream on the rest of the farm. Ensure you open the port that Central Admin is installed on or you will not be able to access. LESSONS LEARNED FROM MOOJJOO
Next was installing MOSS 2007 SP2 slip stream on the rest of the farm. Ensure you open the port that Central Admin is installed on or you will not be able to access. LESSONS LEARNED FROM MOOJJOO
Saturday, March 26, 2011
Friday, November 19, 2010
Add JavaScript to handle two scripts in ASP.NET
protected void ApplyJavaScriptForPostToIris()
{
System.Text.StringBuilder sbValid = new System.Text.StringBuilder();
sbValid.Append("if (confirm('Are you sure you want to post this file to app') == true){");
sbValid.Append("this.disabled = true;");
sbValid.Append("} else { return false;}");
sbValid.Append(this.ClientScript.GetPostBackEventReference(this.btnPostToIRIS, "") + ";");
this.btnPostToIRIS.Attributes.Add("onclick", sbValid.ToString());
}
Tuesday, November 09, 2010
Looping through SQL Server ... This has to be saved. To many hours spent.
I know I will have to do this again....
This article describes various methods that you can use to simulate a cursor-like FETCH-NEXT logic in a stored procedure, trigger, or Transact-SQL batch.
Use Transact-SQL Statements to Iterate Through a Result Set
There are three methods you can use to iterate through a result set by using Transact-SQL statements.
One method is the use of temp tables. With this method, you create a "snapshot" of the initial SELECT statement and use it as a basis for "cursoring." For example:
/********** example 1 **********/
declare @au_id char( 11 )
set rowcount 0
select * into #mytemp from authors
set rowcount 1
select @au_id = au_id from #mytemp
while @@rowcount <> 0
begin
set rowcount 0
select * from #mytemp where au_id = @au_id
delete #mytemp where au_id = @au_id
set rowcount 1
select @au_id = au_id from #mytemp
end
set rowcount 0
A second method is to use the min function to "walk" a table one row at a time. This method catches new rows that were added after the stored procedure begins execution, provided that the new row has a unique identifier greater than the current row that is being processed in the query. For example:
/********** example 2 **********/
declare @au_id char( 11 )
select @au_id = min( au_id ) from authors
while @au_id is not null
begin
select * from authors where au_id = @au_id
select @au_id = min( au_id ) from authors where au_id > @au_id
end
NOTE: Both example 1 and 2 assume that a unique identifier exists for each row in the source table. In some cases, no unique identifier may exist. If that is the case, you can modify the temp table method to use a newly created key column. For example:
/********** example 3 **********/
set rowcount 0
select NULL mykey, * into #mytemp from authors
set rowcount 1
update #mytemp set mykey = 1
while @@rowcount > 0
begin
set rowcount 0
select * from #mytemp where mykey = 1
delete #mytemp where mykey = 1
set rowcount 1
update #mytemp set mykey = 1
end
set rowcount 0
-- ================================================
-- Template generated from Template Explorer using:
-- Create Procedure (New Menu).SQL
--
-- Use the Specify Values for Template Parameters
-- command (Ctrl-Shift-M) to fill in the parameter
-- values below.
--
-- This block of comments will not be included in
-- the definition of the procedure.
-- ================================================
SET ANSI_NULLS ON
GO
SET QUOTED_IDENTIFIER ON
GO
-- =============================================
-- Author: Robert Dannelly
-- Create date: 11/09/2010
-- Description: Resubmission Validation
-- =============================================
CREATE PROCEDURE ResubmissionValidation
-- Add the parameters for the stored procedure here
@ImportID int
AS
BEGIN
-- SET NOCOUNT ON added to prevent extra result sets from
-- interfering with SELECT statements.
SET NOCOUNT ON;
-- Insert statements for procedure here
DECLARE @ResubmissionTest TABLE
(
[ImportMetricID] [int] NULL,
[ImportID] [int] NULL,
[MetricInstanceID] [int] NULL,
[MetricValue] [varchar](100) NULL,
[NDTR] [varchar](20) NULL,
[MetricValueDate] [datetime] NULL,
[Narrative] [varchar](300) NULL,
[Resubmission] [varchar](50) NULL,
[ImportMetricStatus] [varchar](50) NULL,
[ImportFailureMsg] [varchar](200) NULL,
[CurrentMetricValue] [varchar](50) NULL
)
INSERT INTO @ResubmissionTest (ImportMetricID, ImportID, MetricInstanceID, MetricValue, NDTR, MetricValueDate, Narrative,
Resubmission, ImportMetricStatus, ImportFailureMsg, CurrentMetricValue)
SELECT ImportMetricID, ImportID, MetricInstanceID, MetricValue, NDTR, MetricValueDate, Narrative,
Resubmission, ImportMetricStatus, ImportFailureMsg, CurrentMetricValue FROM tblImportMetric WHERE ImportID = @ImportID --Need to change to Variable
-- This is used for Testing RBD
--SELECT * FROM @ResubmissionTest
DECLARE @ImportMetric_ID char(11), @Resubmission varchar(10)
SELECT @ImportMetric_ID = min(ImportMetricID) FROM @ResubmissionTest
--Begin LOOP
WHILE @ImportMetric_ID is not null
BEGIN
DECLARE @MetricInstanceID int,
@MetricValueDate DateTime
SELECT @MetricInstanceID MetricInstanceID FROM @ResubmissionTest WHERE ImportMetricID = @ImportMetric_ID
SELECT @MetricValueDate MetricValueDate FROM @ResubmissionTest WHERE ImportMetricID = @ImportMetric_ID
-- Be sure to change the values to @MetricInstanceID AND @MetricValueDate
EXECUTE ImportCheckResubmission @MetricInstanceID, @MetricValueDate, @Resubmission OUTPUT
IF @Resubmission = 'Yes'
BEGIN
UPDATE @ResubmissionTest
SET ImportFailureMsg = 'There is an existing value for this metric and interval. Please indicate if it is a resubmission.'
WHERE ImportMetricID = @ImportMetric_ID
SELECT @ImportMetric_ID = min(ImportMetricID) FROM @ResubmissionTest WHERE ImportMetricID > @ImportMetric_ID
END
END
DELETE FROM tblImportMetric WHERE ImportID = @ImportID
INSERT INTO tblImportMetric (ImportID, MetricInstanceID, MetricValue, NDTR, MetricValueDate, Narrative,
Resubmission, ImportMetricStatus, ImportFailureMsg, CurrentMetricValue)
SELECT ImportID, MetricInstanceID, MetricValue, NDTR, MetricValueDate, Narrative,
Resubmission, ImportMetricStatus, ImportFailureMsg, CurrentMetricValue FROM @ResubmissionTest WHERE ImportID = @ImportID --Need to change to Variable
--This is used for Testing
--SELECT * FROM tblImportMetric
END
GO
Thursday, November 04, 2010
Demystify SQL Debugging with with Visual Studio
Here is what I did to fix this issue "FINALLY"
http://www.asp.net/data-access/tutorials/debugging-stored-procedures-vb
#1 Connect using Windows Authentication as the same account on the local machine that must have sysadmin rights in the Instance of SQL Server.
#2 They use Server Explorer and connect with that same account and then once connect right click on the DB and check "Application Debuggin. I am posting this to my blog.
Great posts. By the way I feel the pain of remote individuals, my answer tell you management that if you want fast, rapid code to fork up the dough for SQL Developer Edition and do all you coding locally with a quality source control.
Robert.
Tuesday, October 19, 2010
Add Using for Controls or lookup very useful
In VS 2008, when the caret is on the name of the class which doesnt have a using statement in the file, SHIFT+ALT+F10 will bring up a context menu to add the using statement.
Reboot Remotely
When you work in distributed environment you probably use remote desktop session as you primary method of sql server machines administration. When critical windows updates are installed or when you install system or sql server service pack installation wizard promts you to restart the box in order to complete the installation. And it happens from time to time that this machine hangs on reboot process for some reason and you can no longer connect it via remote desktop. If it was you local computer you could enter into your server room and press the reset button but if it stand thousands miles away from you it becomes a real problem.
How to restart or shutdown remote machine
If you can ping this machine from other computer and you have administrators rights on that machine you may use windows utility.
On a computer that has connection to the server which needs to be restarted or shutdown go to Start -> Run and type shutdown -i
This window will show up. Press Add and type either IP or DNS of remote server.
Select shutdown or restart and press OK. That 's it. For your convenience you may run from command line constanct ping (ping servername -t) when the server actually stopped to respond to pings and when it started again.
Alternatively you can go to command prompt (start -> run -> cmd) on your workstation and Typeshutdown -r -m \\x.x.x.x
Replace x.x.x.x with the IP address or computer name of the remote machine. -r option is for restart, don't use -r if want to just shut down the system.
Replace x.x.x.x with the IP address or computer name of the remote machine. -r option is for restart, don't use -r if want to just shut down the system.
Thursday, August 05, 2010
SharePoint Site Collection Administration
Lesson learned. If you are ever asked to maintain a SharePoint site the first thing to do is say, "Grant me Site Collection Admin Rights". Why? Because if you are testing security and you do not know who the Site Collection Admin are then if you remove security the individuals in that role will still have access. (Nice 2 hour lesson learned)
Thursday, June 17, 2010
AJAX Install
If you develop ASP.NET applications with AJAX here is a step by step guide so you do not bang your head.
1) Download the latest version from CodePlex for AJAX.
2) Extract to a location of your choice
3) Add the AjaxControlToolkit.dll & AjaxControlToolkit.pdb to you Web layer project /bin folder
4) Create a new Tab in your Toolbox and point to the new AjaxControlToolkit.dll
5) Create a reference to your AjaxControlToolkit.dll
6) Finally ensure the line in your Web.config is that same version as your dll assembly -
Friday, April 16, 2010
Visual Studio 2010
Microsoft has released Microsoft Visual Studio 2010. I think it is time for me to upgrade to Windows 7 and start using there new tool set in order to keep up with the times.
SharePoint and SQL Sever Reporting Integration
Well, I must tell you that I had to reach out to Microsoft yesterday and use 1 of my support calls with my MSDN Subscriptions. I have been tasked with integrated SQL Server Reporting Services with MOSS 2007.
This will be the first implmentation at my company and I very excited to have a fantastic presentation for my upper managment.
A lot of work has been put into this and I plan to sell this great feature.
This will be the first implmentation at my company and I very excited to have a fantastic presentation for my upper managment.
A lot of work has been put into this and I plan to sell this great feature.
Thursday, April 01, 2010
New Trick Envrionment Variables
public static string SecurePath = Environment.GetEnvironmentVariable("SECURED_APP_PATH");
You can right click on your computer > Advanced Tab > set the variables. Warning they will not take effect till a reboot.
This would not worth using for a hosted appllication when you do not have access to the server.
You can right click on your computer > Advanced Tab > set the variables. Warning they will not take effect till a reboot.
This would not worth using for a hosted appllication when you do not have access to the server.
Monday, March 08, 2010
Time to build the app
I am ready to build the app for retirement. 1 to 2 hours a day.
Define - 20 more hours
- Design DB (Completed)
- Design Workflow (Completed)
- Design UI(s) All screens (Completed)
- Design Objects (Completed)
Measure - 10 hours (2-6 Months, but will be done before I am 40 :-) )
Analyze - 40 hours (Done)
Improve (Build) - (In Process)
- Database Development (8 Hours Completed)
- Application (Web to start in Progress 2-6 months
* Web UI
* Business Layer
* Data Layer (Completed)
* Test Test Test fix fix fix test test test
* Demo to friends and family (Huge Milestone - break out Beer and Wine)
Control - Will know after Improve Phase)
Friday, February 19, 2010
Trace.axd
One thing I am going to remember is Trace with ASP.NET... It is so powerfull to watch Application, Session and ViewState.
<trace enabled="true" requestLimit="40" localOnly="false" />
Very important when troubleshooting:
http://msdn.microsoft.com/en-us/library/y13fw6we%28VS.71%29.aspx
<trace enabled="true" requestLimit="40" localOnly="false" />
Very important when troubleshooting:
http://msdn.microsoft.com/en-us/library/y13fw6we%28VS.71%29.aspx
Thursday, February 04, 2010
Kill Task in XP
c:\>taskkill /pid 3252 /F
Force kill aspnetwp.exe....
Than stop the IIS and then delete temporary files.
Force kill aspnetwp.exe....
Than stop the IIS and then delete temporary files.
Monday, January 11, 2010
Ctrl-Alt-Del on remote desktop aka server
In order to send Ctrl-Alt-Del keystrokes to remote computer connected via Remote Desktop client, just press the following workaround keyboard shortcuts specially used in Remote Desktop environment:
Ctrl+Alt+End
Ctrl+Alt+End
Friday, October 30, 2009
Database Design and Audit
When developing ASP.NET application that use a APP Pool and identity to make all calls to the back end database in order to have a trigger based solution for auditing.
I would recommend all your tables have updatedDT and updateBY columns in all the tables you want to audit.
Tuesday, September 15, 2009
Leading a Development Team
New idea for a Development Team lead.
Depending on the scope of the technical requirements, it is the job of the team lead to review all documentation. PERIOD. From the technical specs the DEV LEAD develops the HLD/LLD specs, make estimates on the Business Analysis for each HLD/LLD.
Next, grant the developer the proper time to analyze the HLD/LLD requirements written by the tech lead. Tech Lead should read the HLD/LLD to ensure they are complete and time the review time and add 1 hour to allow developer the time needed to read the documentation and allow time the developer to ask questions to close gaps on missing requirements.
Once the business and the tech lead sort out these issues a developer should not code until all gaps are filled.
If you do, you will be doing rework on the project, thus costing time which as we all know == MONEY.
Wednesday, July 22, 2009
Team work
Team work is the key important part of any project along with communication. Always communicate and work hard and do your best.
Wednesday, April 29, 2009
Assignments
DUhG
If you see that something does not work in Visual Studio because it is not set as an assignment on a property.
Include the = symbol.
Example
li.select;
Will not work
li.select = true; //will.
Tuesday, March 31, 2009
Change My Documents
Ability to change the My Documents path is restricted.
This setting can restrict the ability to change the current path of My Documents folder.
Click here to run a free scan for registry errors
Description:
Every user on a computer has some files and folders of personal use. The my documents folder is the users personal folder where he normally saves all his documents, pictures, music and other personal files. If more than one user account is created on the computer, windows creates the my documents folder for each account. This setting disables the users ability to change the default location/path of the my documents folder. The user can invoke the my documents properties dialog by right-clicking the folder, but the access to change the folder location is denied. For this, go to start > run menu, enter regedit and navigate to the registry path listed below. You can create a dword value disablepersonaldirchange, if this value does not exist. Now, right-click and modify the value to 1 which can restrict change in folder path. However, if you want to enable the changes, delete the value name disablepersonaldirchange. The changes take effect after a restart or logoff.
Level: Recommended For Experts Only
Registry Entries
Click here to run a free scan for registry errors
· Path: [HKEY_CURRENT_USER\Software\Microsoft\Windows\CurrentVersion\Policies\Explorer\]
· Location: Current User
· Value Name: DisablePersonalDirChange
· Data Type: DWORD (DWORD Value)
· Enabled Value: 1
· Disabled Value: 0
· Action Type: Add an Entry
Screenshots
Click here to run a free scan for registry errors

First, click the Start button, and select Run. In the resulting dialog box, type "regedit"

Second, go to [HKEY_CURRENT_USER\Software\Microsoft\Windows\CurrentVersion\Policies\Explorer\] and create a DWORD value "DisablePersonalDirChange.

Third, right-click on "DisablePersonalDirChange" and select 'Modify'.

Finally, set the "Value Data" to 1in the textbox provided and click on 'OK' to enable
Monday, January 26, 2009
Monday, January 12, 2009
Enable Remote Connections in SQL Express
Read the following article http://support.microsoft.com/default.aspx?scid=kb;EN-US;914277
To enable remote connections on the instance of SQL Server 2005 and to turn on the SQL Server Browser service, use the SQL Server 2005 Surface Area Configuration tool. The Surface Area Configuration tool is installed when you install SQL Server 2005.
Enable remote connections for SQL Server 2005 Express or SQL Server 2005 Developer Edition
You must enable remote connections for each instance of SQL Server 2005 that you want to connect to from a remote computer. To do this, follow these steps:
1. Click Start, point to Programs, point to Microsoft SQL Server 2005, point to Configuration Tools, and then click SQL Server Surface Area Configuration.
2. On the SQL Server 2005 Surface Area Configuration page, click Surface Area Configuration for Services and Connections.
3. On the Surface Area Configuration for Services and Connections page, expand Database Engine, click Remote Connections, click Local and remote connections, click the appropriate protocol to enable for your environment, and then click Apply.
Note Click OK when you receive the following message:
Changes to Connection Settings will not take effect until you restart the Database Engine service.
4. On the Surface Area Configuration for Services and Connections page, expand Database Engine, click Service, click Stop, wait until the MSSQLSERVER service stops, and then click Start to restart the MSSQLSERVER service.
Enable the SQL Server Browser service
If you are running SQL Server 2005 by using an instance name and you are not using a specific TCP/IP port number in your connection string, you must enable the SQL Server Browser service to allow for remote connections. For example, SQL Server 2005 Express is installed with a default instance name of Computer Name\SQLEXPRESS. You are only required to enable the SQL Server Browser service one time, regardless of how many instances of SQL Server 2005 you are running. To enable the SQL Server Browser service, follow these steps.
Important These steps may increase your security risk. These steps may also make your computer or your network more vulnerable to attack by malicious users or by malicious software such as viruses. We recommend the process that this article describes to enable programs to operate as they are designed to, or to implement specific program capabilities. Before you make these changes, we recommend that you evaluate the risks that are associated with implementing this process in your particular environment. If you choose to implement this process, take any appropriate additional steps to help protect your system. We recommend that you use this process only if you really require this process.
1. Click Start, point to Programs, point to Microsoft SQL Server 2005, point to Configuration Tools, and then click SQL Server Surface Area Configuration.
2. On the SQL Server 2005 Surface Area Configuration page, click Surface Area Configuration for Services and Connections.
3. On the Surface Area Configuration for Services and Connections page, click SQL Server Browser, click Automatic for Startup type, and then click Apply.
Note When you click the Automatic option, the SQL Server Browser service starts automatically every time that you start Microsoft Windows.
4. Click Start, and then click OK.
Note When you run the SQL Server Browser service on a computer, the computer displays the instance names and the connection information for each instance of SQL Server that is running on the computer. This risk can be reduced by not enabling the SQL Server Browser service and by connecting to the instance of SQL Server directly through an assigned TCP port. Connecting directly to an instance of SQL Server through a TCP port is beyond the scope of this article. For more information about the SQL Server Browser server and connecting to an instance of SQL Server, see the following topics in SQL Server Books Online:
- SQL Server Browser Service
- Connecting to the SQL Server Database Engine
- Client Network Configuration
Create exceptions in Windows Firewall
These steps apply to the version of Windows Firewall that is included in Windows XP Service Pack 2 (SP2) and in Windows Server 2003. If you are using a different firewall system, see your firewall documentation for more information.
If you are running a firewall on the computer that is running SQL Server 2005, external connections to SQL Server 2005 will be blocked unless SQL Server 2005 and the SQL Server Browser service can communicate through the firewall. You must create an exception for each instance of SQL Server 2005 that you want to accept remote connections and an exception for the SQL Server Browser service.
SQL Server 2005 uses an instance ID as part of the path when you install its program files. To create an exception for each instance of SQL Server, you must identify the correct instance ID. To obtain an instance ID, follow these steps:
1. Click Start, point to Programs, point to Microsoft SQL Server 2005, point to Configuration Tools, and then click SQL Server Configuration Manager.
2. In SQL Server Configuration Manager, click the SQL Server Browser service in the right pane, right-click the instance name in the main window, and then click Properties.
3. On the SQL Server Browser Properties page, click the Advanced tab, locate the instance ID in the property list, and then click OK.
To open Windows Firewall, click Start, click Run, type firewall.cpl, and then click OK.
Create an exception for SQL Server 2005 in Windows Firewall
To create an exception for SQL Server 2005 in Windows Firewall, follow these steps:
1. In Windows Firewall, click the Exceptions tab, and then click Add Program.
2. In the Add a Program window, click Browse.
3. Click the C:\Program Files\Microsoft SQL Server\MSSQL.1\MSSQL\Binn\sqlservr.exe executable program, click Open, and then click OK.
Note The path may be different depending on where SQL Server 2005 is installed. MSSQL.1 is a placeholder for the instance ID that you obtained in step 3 of the previous procedure.
4. Repeat steps 1 through 3 for each instance of SQL Server 2005 that needs an exception.
Create an exception for the SQL Server Browser service in Windows Firewall
To create an exception for the SQL Server Browser service in Windows Firewall, follow these steps:
1. In Windows Firewall, click the Exceptions tab, and then click Add Program.
2. In the Add a Program window, click Browse.
3. Click the C:\Program Files\Microsoft SQL Server\90\Shared\sqlbrowser.exe executable program, click Open, and then click OK.
Note The path may be different depending on where SQL Server 2005 is installed.
APPLIES TO
- Microsoft SQL Server 2005 Developer Edition
- Microsoft SQL Server 2005 Express Edition
Friday, January 02, 2009
Happy New Year
Happy New Year to all and I am looking forward to a happy, prosperous, healthy and knowledge filled year. I wish everyone goodness and joy. Remember to focus on your family and loved ones.
This year I will be looking to achieve a weekly blog post to reflect on the week.
Moojjoo
Sunday, December 21, 2008
12/21/2008 - Code thoughts
I have been wondering what a laptop is like with just ubuntu. I am a .NET guy and I would have to convert to Apache, PHP, mySQL. Which are all free.
__________________________________________
Robert B. Dannelly, Jr. MCTS
Friday, December 19, 2008
Configure Firefox to work with localhost.
Here is the Solution for Other Users
Firefox - Enter username and password for "" at http://localhost - Solution
IIS uses Integrated Authentication and by default IE has the ability to use your windows user account...but don't worry, so does Firefox but you'll have to make a quick configuration change.
1) Open up Firefox and type in about:config as the url
2) In the Filter Type in ntlm
3) Double click "network.automatic-ntlm-auth.trusted-uris" and type in localhost and hit enter
4) Write Thank You To Blogger
As Always, Hope this helped you out.
Wednesday, December 10, 2008
December post
Well, I must say life has been busy for November I got handed over 43 servers for a true dev to prod environment of SharePoint.
Wednesday, October 15, 2008
Outlook notes on desktop
Credit to http://www.onetipaday.com/2006/10/15/how-to-save-put-outlook-notes-on-your-desktop
I often use the Microsoft Outlook Notes to store To-Do lists that are not related to work. I discovered this great tip a few months which allows me to put my notes on my desktop, and I love it as it means I can access my notes without having to open up Outlook.
To create a note in Outlook:
1. On the File menu, point to New, and then click Note.
2. Type the text of the note.
3. To close the note, click the × in the upper-right corner of the note.
Then to put the notes on your desktop do the following:
1. Right-click the desktop, point to New, and click Shortcut.
2. In the Type the location of the item box, type the following path: “C:\Program Files\Microsoft Office\OfficeXX\OUTLOOK.EXE” /c ipm.stickynote (note OfficeXX - XX needs to be replaced with your version of Office.
3. Click Next, name the shortcut, and then click Finish.
Now, when you double-click the shortcut, an Outlook note will appear on your desktop.
Excel Services Event ID: 5226
If you have installed SharePoint per default configurations you will most likely not get issues like this, but in most enterprise installs logs and temp files are relocated. To fix the error below. Please review error then read below for solution.
Event Type: Error
Event Source: Office SharePoint Server
Event Category: Excel Calculation Services
Event ID: 5226
Date: 10/15/2008
Time: 9:32:36 AM
User: N/A
Computer: CR2RCHIISIME
Description:
Unable to create or access workbook cache at D:\Temp\Excel Server\FileCache\BaselII-CIT-SSP-423345403\Charts. Excel Services is unable to function without a workbook cache.
For more information, see Help and Support Center at http://go.microsoft.com/fwlink/events.asp.
Solution I manually created the D:\Temp\Excel Server\FileCache\BaselII-CIT-SSP-423345403\Charts directory then on the Security tab for the Temp directory, the WSS_ADMIN_WPG Windows group should have Full Control and the WSS_WPG Windows group should have Read & Execute, List Folder Contents, and Read permissions or higher on the folder. If they do not, assign these permissions by using the procedure in the "Assign sufficient permissions" section.
Also, this solution works if you get Trace Log errors.
Friday, August 01, 2008
Date in Task Bar
Got this from Windows XP site. Worth re-post
To display the date as well as the time, you need to make the taskbar "taller" by dragging the top edge upward. This procedure is fairly simple but it does require reasonably precise mouse handling. If you are new to computing and still developing your mouse-skills, expanding the taskbar, or returning it to the default height, may prove to be a little problematical. If you are not yet confident with fiddly mouse manipulation, I would suggest that you postpone using this tip until you gain more mousing experience.
Here's how to expand the taskbar:
The taskbar needs to be "unlocked" before you can expand it. To check, right-click the taskbar and ensure that "Lock the Taskbar" is not ticked. If there is a tick, click "Lock the Taskbar" to untick it.
Close any running programs so that the taskbar is uncluttered and easier to manipulate.
Move your mouse to the top edge of the taskbar until the cursor turns into a doubled-ended arrow.
With the doubled-ended arrow displayed, hold down the left mouse button and drag the taskbar upward until it is about twice the normal height.
The day and date should now be displayed below the Notification Area clock.
If desired, you can now re-lock the taskbar.
The expanded taskbar not only permanently displays the day and date, it also provides extra display space for taskbar and notification area icons. Of course, the downside of an expanded taskbar is that you have less screen display area for programs and files.
To return the taskbar to its original height, follow the procedure outlined above but reverse the drag direction specified in step 4. That is, with the doubled-ended arrow displayed, hold down the left mouse button and drag the taskbar towards the bottom of the screen until it is the normal height.
Tuesday, July 29, 2008
SQL Server Reporting Services Datasource Security
http://technet.microsoft.com/en-us/library/ms160330.aspx
Stored Credentials
You can store the credentials used to access an external data source. Credentials are stored in reversible encryption in the report server database. You can specify one set of stored credentials for each data source used in a report. The credentials you provide retrieve the same data for every user who runs the report.
Stored credentials are recommended as part of a strategy for accessing remote database servers. Stored credentials are required if you want to support subscriptions, or schedule report history generation or report snapshot refreshes. When a report runs as as a background process, the report server is the agent that executes the report. Because there is no user context in place, the report server must get credential information from the report server database in order to connect to a data source.
The user name and password that you specify can be Windows credentials or a database login. If you specify Windows credentials, the report server passes the credentials to Windows for subsequent authentication. Otherwise, the credentials are passed to the database server for authentication.
Windows Integrated Security
When you use the Windows Integrated Security option, the report server passes the security token of the user accessing the report to the server hosting the external data source. In this case, the user is not prompted to type a user name or password.
This approach is recommended if Kerberos is enabled. If Kerberos is not enabled, you should only use this approach if all the servers that you want to access are located on the same computer.
In other words each user would need to be added access to the Database Hosted on SQL Server
Wednesday, July 02, 2008
SQL Network Interfaces, error: 26 - Error Locating Server/Instance Specified or Named Pipes Provider, error: 40 - Could not open a connection to SQL S
The problem was that the remote connection needed to utilize Named Pipes, but in order to utilize Named Pipes both the machine hosting the instance of SQL and the my local machine must have the alias:
With Supports instruction I went to SQL Server configuration Manager, expanded SQL Native Client Configuration and right clicked Aliases and created the alias on the machine and did the same for my personal machine and what do you know, it worked.
With Supports instruction I went to SQL Server configuration Manager, expanded SQL Native Client Configuration and right clicked Aliases and created the alias on the machine and did the same for my personal machine and what do you know, it worked.
Tuesday, July 01, 2008
How to determine what ports are open
start -> run -> cmd
netstat -na
look for :3306 and LISTEN on the same line...
OR..also from command prompt
telnet localhost 3306
netstat -na
look for :3306 and LISTEN on the same line...
OR..also from command prompt
telnet localhost 3306
Friday, June 27, 2008
Vitual PC 2007
Well, it has been a while since I have blogged due to the project I am working on at work. The project MOSS 2007 from dev, test, and prod.
Before dev there is a place called pre-dev, where developers like myself need a place to develop, so this past March I attended the SharePoint 2007 conference where I met some great resources and obtained a VHD of MOSS 2007 and learned that most developer's develop in this fashion by downloading and installing the software from the MSDN Subscription, and routing code to a source control server.
Well I installed and could not get it to run, due to my lack of knowledge of Virtual PC 2007. I have a laptop with 1 gig of RAM and a external HD with 500 gig so I installed the VHD and fired up the Virtual PC, but I kept getting an error. Not enough memory on the host machine.
I thought to myself, "That is strange 1 gig should be enough memory to get my image up and running." Well it turns out I had to much memory allocated to the VM, so I set it back to 512mb and bam... The VM started to run, but it is also running dog slow, so in closing have 2 gig of RAM so you can allocate 1 gig to the VM.
Hope this helps out my fellow developers.
OUT... Moojjoo
Wednesday, March 26, 2008
Upgrading from SQL Express 2005 to SQL 2005 Developer Edition
Upgrading from SQL Express 2005 to SQL 2005 Developer Edition (2 hours)
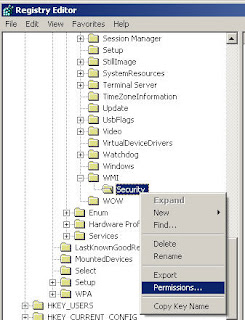
Note: First ensure you have access to the following key in the registry
You are most likely an admin if you are installing Developer Edition of SQL 2005 so be sure the following setting is set.
Go to Start > Run > enter regedit>
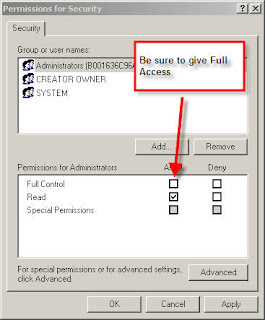
SYSTEM\CurrentControlSet\Control\WMI\Security ß Give Admins Full Contrl (Be sure to change this back so you don’t get yourself into trouble) >
Next slap the DVD or CD’s into your Rom Drive>
Start > Run > cmd>

Follow the prompts>
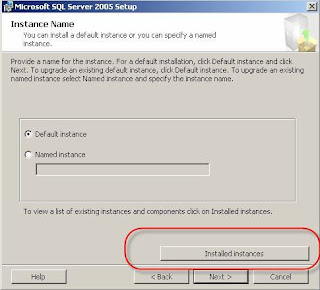

User your UID, PWD and Domain>
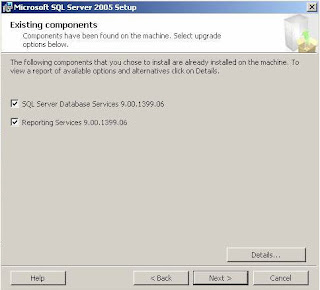
Your good to go when you see:>
Don't forget Service Pack 2
Note: First ensure you have access to the following key in the registry
You are most likely an admin if you are installing Developer Edition of SQL 2005 so be sure the following setting is set.
Go to Start > Run > enter regedit>
SYSTEM\CurrentControlSet\Control\WMI\Security ß Give Admins Full Contrl (Be sure to change this back so you don’t get yourself into trouble) >
Next slap the DVD or CD’s into your Rom Drive>
Start > Run > cmd>
Follow the prompts>
User your UID, PWD and Domain>
Your good to go when you see:>
Don't forget Service Pack 2
Tuesday, March 04, 2008
MCTS - SharePoint Developer
Passed the Microsoft Exam SharePoint 2007 Developer
I am now officially and Microsoft Certified Technical Specialist.
I am now officially and Microsoft Certified Technical Specialist.
Wednesday, February 20, 2008
Back versus Attaching to MDF
Chintal my new programming parnter taught an old dog a new trick today. Instead of backing up and restoring databases simply open Windows Explorer and copy the .MDF and .LDF and zip move, copy, cut and attach back with SQL Server Management Studio SSMS.
Thursday, February 14, 2008
Working with Infrastructure in the Enterprise as a Programmer Analyst
For 10 years I have been working as an analyst first then putting on the programmer hat and developing applications. In corporate America you need to concentrate on your ability to work with your infrastructure architects and be very open minded. I have learned that you must take time to explain in great detail what your solution design is doing. Most web solutions involve web servers and database servers along with needing separate environments for development, user acceptance testing and production. Your solution may be Intranet or Internet, but the key to working with your infrastructure architect is to document, document, document. Use applications such as Visio to convey to them what you are trying to accomplish in the form of a picture (Remember a picture speaks a thousand words). It will save you your sanity and provide a great working relationship with your architect. Humans are not mind readers so document and draw your solution with time and patience. And last, but not least be sure to consult with your architect and have your environments built before coding a solution and ensure all the environment mirror one another, that way you will not freak out when your app works in one environment and not the other.
Words of Wisdom from an individual who loves what they do, but has pulled a bit of hair out learning the ropes.
Thanks to my mentors
Doug Cain
Larry Leonard
Eddie Clodfelter
Troy Tucker
Robert Petree
Shaun Todd
Saran
Garry Blanks
Kelly O'Donnell
Words of Wisdom from an individual who loves what they do, but has pulled a bit of hair out learning the ropes.
Thanks to my mentors
Doug Cain
Larry Leonard
Eddie Clodfelter
Troy Tucker
Robert Petree
Shaun Todd
Saran
Garry Blanks
Kelly O'Donnell
Monday, February 04, 2008
Start explorer in C:
Start Windows Explorer In The C Drive
In the Explorer property sheet use this path and switches in the target:
C:\windows\explorer.exe /n,/e,c:\
Since the first days Windows Explorer appeared, the list of switches reproduced below has been floating around the internet. I'm not sure who was the first to assemble the list but here it is in its entirety. Play around with it and see if one of the views is what you're seeking. Just copy and paste the bold text into the Target line on the Property Sheet of Windows Explorer. If it's not what you expected you can always switch back to the default view by using C:\WINDOWS\explorer.exe in the Target line.
"My Computer" highlighted in left side with all drives visible but not expanded and C: highlighted in right side: %SystemRoot%\explorer.exe /e,/select,c:
Desktop highlighted and nothing expanded: %SystemRoot%\explorer.exe /e,/n,/select,/root,c:
All drives visible and the system drive highlighted and expanded in full screen: %SystemRoot%\explorer.exe /e,/select
All drives visible and the system drive expanded in small screen: %SystemRoot%\explorer.exe /e,/select,%systemroot%
Only Windows Directory visible highlighted and expanded: %SystemRoot%\explorer.exe /e,/root,%systemroot%
All drives visible but only C: highlighted and expanded: %SystemRoot%\explorer.exe /e,c:
Nothing expanded and My Computer highlighted in right side: %SystemRoot%\explorer.exe /n,/e,/select,
Opens the Windows folder as a folder: %SystemRoot%\explorer.exe %systemroot%
Opens as "My Computer": %SystemRoot%\explorer.exe %systemroot%,
This opens the Desktop folder with "My Computer" highlighted: %SystemRoot%\explorer.exe %systemroot%,/select,
"Desktop" highlighted in the left side and no drives visible:
%systemroot%\explorer.exe /e,/root,::{20D04FE0-3AEA-1069-A2D8-08002B30309D},/select
"My Computer" highlighted in left side and all drives visible but none expanded:
%systemroot%\explorer.exe /e,/root,::{20D04FE0-3AEA-1069-A2D8-08002B30309D}
"Desktop" in left side highlighted and "My Computer" highlighted in right side and no drives visible:
%systemroot%\explorer.exe /e,/select,::{20D04FE0-3AEA-1069-A2D8-08002B30309D}
Wednesday, January 02, 2008
Kill Instance of Application
Recently I was receiving an issue with an application I am supporting.
Problem
The application is a .NET Console application that using Microsoft Word to create reports. The problem is that an exception error would occur if Microsoft Word (WINWORD = Instance Name) was running.
Solution
// Code to kill Word issues if WINWORD is running on the current machine
// if word is running the reports will throw an exception so // we must ensure the Microsoft Word application is not running Process[] wordProcess = System.Diagnostics.Process.GetProcessesByName("WINWORD");if (wordProcess.Length <= 1)
{
foreach (Process p in wordProcess)
{
p.Kill();
}
}
Subscribe to:
Posts (Atom)